Sunday, October 5, 2008

Back to the Future Halloween

I thought I'd share a couple of projects I made tutorials for in October of last year. Both of them use the Batty For You stamp set, which is still available this year. However, the basket is decorated in Designer Series Paper (DSP) which is no longer available, and the box is decorated with a wheel that is no longer available.

To bring you Back to the Future to reproduce these goodies, I recommend using Ghostly Greetings Designer Series Paper for the basket, and the Scary Skulls wheel for the box (the wheel is not actually scary, and it features a solid image very similar in size to the jack-o-lanterns on the wheel I used in the box tutorial). In addition, you now have the opportunity to purchase the Scallop Edge Punch to finish the flap on your box, instead of using the Corner Rounder Punch in a modified manner.


Click HERE to view the Creepy Little Basket Tutorial.


Click HERE to view the Spooky Little Box Tutorial.

When you're ready to purchase your supplies, hop on over to my SU! web site and click on the SHOP NOW button near the top right of the screen to place your Online Order! If Halloween is not your thing, and you don't care for orange and/or purple, and you'd like to make these projects with other images and/or in other colors, just email me and I'll gladly help you with your custom design needs :-)

Friday, October 3, 2008

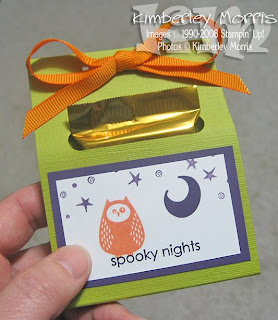
More Halloween Ghirardelli Treat Holders

Remember yesterday when I said these would be cute made in Ghostly Greetings Designer Series Paper, with the Chills & Thrills Rub-ons? Well, I don't think I was wrong...these may be the cutest Halloween treats I've ever made! [Remember, click on any image to see it larger.]


You can find the TUTORIAL for these gems right HERE. The hardest part of making these was restraining myself from eating all the chocolate squares before I could put them in the holders. This is definitely a project I need to do with my jaw wired shut! Actually, I did make these a lot more complicated than necessary, but I was having a lot of fun and I just couldn't stop myself. They look totally adorable with just the Ghostly Greetings Designer Series Papers layered on them with a contrasting color of card stock.

I'm not going to go into detail on how these were put together, but I do want to make a few notes. First, for the Basic Black and Basic Gray holders, I did not use Textured card stock. I think they look a little flat, so I highly recommend buying a package of the Neturals 12"x12" Textured Card Stock Assortment for these. I also varied from my first measurements and made my DSP layers 2-3/4" x 1-3/4" on these treat holders, and made the card stock layer below them just about 1/16" longer on each side.

I used Kiwi Kiss and Pumpkin Pie Textured card stock for the green and orange treat holders. You might find it more convenient and cost efficient to purchase an In Color 12"x12" Textured Card Stock Assortment and then use the Kiwi Kiss and Tangerine Tango colors. However, Pumpkin Pie is the color which directly coordinates with the Ghostly Greetings Designer Series Paper. If you choose to go ahead and purchase an individual package of Pumpkin Pie 12"x12" Textured Card Stock, you can use that again to make placecard treat holders for Thanksgiving.

To tie the treat holders closed, I used four different products: Kiwi Kiss Striped Grosgrain, Tangerine Tango Striped Grosgrain (you could always substitute Pumpkin Pie Striped Grosgrain for this), Black Hemp Twine, and Rope Twine (New! Find it in the Holiday Mini Catalog) which I unraveled after I knotted it. Also, the Earth Elements Colored Buttons coordinate well with Kiwi Kiss and Pumpkin Pie. And I couldn't pass up using the Curly Label punch from the Curly Label Punch Bundle. The Curly Label punch also works with one of the images in the new Eat, Drink & Be Scary stamp set in the Holiday Mini Catalog, so it can do double duty on your spooky stamping projects!

You might also notice that I used the Large Oval Punch, and the Wide Oval Punch. And, I did a little distressing with the tool in the Cutter Kit on some of the punched pieces. I also trimmed out some of the pieces in the Chills & Thrills Rub-ons, to omit parts or use parts separately in different orientations. Finally, on the black pumpkin rub-on I put on the Kiwi Kiss "boo" tag, I actually used my 1/8" punch to punch out his eyes, and used my Hobby Blade to carve out his mouth, then layered that tag onto Pumpkin Pie card stock.

Even if you don't want to make these treat holders for Halloween, you still have my permission to buy some Ghirardelli Chocolate Squares™ to keep by your stamping desk for times of creative crisis ;-) Of course, if your kids see them, you can always explain they are for a "project", and you can show them my tutorial if they call your bluff!!!

Thursday, October 2, 2008

Ghirardelli® Chocolate Square Holder Tutorial

As promised, here are the instructions for making the Halloween Ghirardelli Treat Holder pictured below. If you don't see them in your local store, you can find Ghirardelli® Chocolates online HERE.


Cut a sheet of card stock to 3"x8" for the base. Because of the round numbers, Textured 12"x12" card stock is ideal to use for this project. You can get four 3"x8" treat holder bases from each 12"x12" sheet. If you order an assortment of In Color 12"x12" Textured card stock, you can use the Kiwi Kiss and Tangerine Tango sheets together. Simply cut the 3"x8" bases from each sheet, then use the leftover scraps of each sheet to layer onto the front of the opposite color base!

Okay, back to where I started--cut a sheet of card stock to 3"x8". Then score the card stock at 3-7/8" and at 4-1/8". [Remember, you can click on any picture to view it at full size.]


Optional: If you want to use a Stampin' Around wheel to decorate the base, you should do that now. Just be mindful of your placement with any words or images on your wheel which have a definite "right side up" pattern, as shown in the picture below. Use plain paper to cover and mask off areas on which you don't want the wheeled pattern. Be aware that about 2-1/8" of the top front of your holder will be taken up with the slot for the chocolate, and with a ribbon closure.


From one end of the card stock (choose either, it doesn't matter), slide your Word Window Punch as far into the card stock as it will go, and punch. You will be punching over it on each edge, so just do it somewhere in the middle for placement, as shown below.


Then slide your Word Window Punch over until the side of the punch casing is even with one edge of the card stock. Punch, then repeat this process on the opposite edge of the card stock. See the pictures below for more notes.


You will end up with an extended Word Window Punch shape across one end of your holder, as pictured below. This will be the front of your holder.


Decorate the front of your holder as desired. The area you'll have to work with runs from just below your Word Window punched hole, to the score line, and is approximately 2-1/4". The bottom decorative card stock layer on my treat holder is 2-3/4" x 1-3/4", and the top white layer is 2-1/2" x 1-1/2".


I used Kiwi Kiss, Tangerine Tango, and Eggplant Envy for this project, as I really like that combination for Halloween. The Eggplant Envy card stock I used is not Textured, because I'm layering over it, and it seems a waste to me to have most of the Textured card stock covered up! I also used the Halloween Frights stamp set, and the Frightful Fence wheel (shown on the Optional sample), both available for you to order now from the Holiday Mini Catalog.

After you have decorated your holder, punch two holes in the top front above the Word Window punched hole, with the Rectangle Punch, for a ribbon bow. Fold the holder closed with the edges flush at the top and hold firmly in place, then punch through your rectangle holes on the front, to create holes in the back of the holder at the same place. See pictures of theses steps below:


HORIZONTAL SLOT PUNCH METHOD: This is a great alternative to the Rectangle Punch shown above. Simply slide your card stock into the Horizontal Slot Punch as far as it will go, then line up the corner of your card stock with the bottom piece of metal on the punch, and squeeze. No measuring, no worrying if it's straight or not. I recommend punching each of the 4 corners separately, because it's not good for your punch to punch through more than one layer at a time. (See pictures below for visual--click images to see them larger.)


Thread ribbon through rectangle holes and tie in a bow or knot at the front of your holder. Slide your Ghirardelli Chocolate Square into the Word Window punched slot, and you're ready to share a treat with your favorite ghouls and gargoyles!

On the Frightful Fence sample below, I used brads to close the treat holder, then cut out some shapes from the Halloween Frights stamp set and adhered them over the brads, and in other decorative positions. I also used a Blender Pen in Close to Cocoa ink to go back over the fence and fill in some of the spots which were omitted due to the texture of the card stock. And as a final highlight, I went over the cobwebs in the fence with a Basic Black Stampin' Write® marker.


These Ghirardelli Chocolate Square treat holders can be made even more quickly and easily by using the Ghostly Greetings Designer Series Paper, and you can even include greetings without doing any stamping, if you use the Chills & Thrills Rub-Ons! These treat holders are also versatile throughout the year when decorated seasonally appropriate--consider making them as placecard favors on your Thanksgiving table, as stocking stuffers or treats for co-workers for Christmas, or for Valentine's Day treats. With chocolate, and sharing your creativity, at the heart of this project, you can't go wrong!

Saturday, September 27, 2008

4-1/4 x 4-1/4 Four Pack


Today's post is a little project I came up with Friday afternoon. I'm really into making packs of cards to have in advance, not so much for my own use, but because they make GREAT gifts! Everyone loves getting a package of handmade greeting cards they can just pull out and use. I also get a lot of satisfaction out of designing simple-to-assemble projects which efficiently use my supplies, and I think this one is a wonderful example. [Remember: you can see any picture at full size by clicking on it!]

A recent trend is to make 4"x4" cards, which use 12"x12" paper efficiently, but I'm one of those gals who stuck with cassette tapes for years after CDs came out, so most of my card stock is still letter sized (8-1/2"x11"). I guess one major feature of our 12"x12" card stock is that it comes in assorted Textured packages...which is really cool, but it's only textured on one side, and I tend to cover most of a card front, so that seems like kind of a waste of the effect to me.

Now, our Designer Series Papers (DSP) only come in 12"x12" sheets, which would efficiently make 4"x4" cards, because you can easily cut them in multiples of 4", but they are only paper and not card stock. So, my answer to this was to use my letter sized card stock cut to 8-1/2" squares, then cut in half to create two foldover 4-1/4" square cards! Then, I can layer neat 4" squares of DSP over them, and use the little bits of the leftover letter sized card stock to decorate them.

I added just a bit of scrap Whisper White and Very Vanilla card stock, and some coordinating punches and embellishments, a coordinating stamp set (Upsy Daisy--on SALE, get it at 15% OFF through September 30th!) and limited myself to the colors which coordinate with the Urban Garden DSP package I used. I also used Whisper White and Very Vanilla medium envelopes, neatly trimmed to fit 4-1/4" square foldover cards, and then packed the whole enchilada (four cards + four envelopes) in a custom-designed box which was also made from a coordinating letter sized sheet of card stock.

Of course, the Upsy Daisy stamp set and the Urban Garden Designer Series Paper are both flower themed, but you can come up with masculine cards using these supplies! Each side of a sheet of Designer Series Paper has a different design, and there are a number of gender-neutral designs available, even within some of the flower-themed packages. My striped "Birthday Celebrations" card is a prime example of using Urban Garden DSP to create a masculine card.

I'll post the instructions and tutorial for the cards and boxes after the weekend, but in the meantime, check out the Stampin' Supplies and click on over to my SU! web site and click on the SHOP NOW button near the top right to use Online Ordering to get what you need!

For your planning, you'll want to know that if you decorate each of the four cards PLUS your box front with 4" DSP squares (as shown in the photo at the top of this post), you can make 21 Boxed Sets of these cards using one package of DSP. If you only use the DSP to layer on each of the four card fronts, you can make 27 Four Packs of cards from one package of DSP. You can get two 4-1/4"x4-1/4" foldover cards from each sheet of letter sized card stock, and one box from each sheet of letter sized card stock. I'd vary between each of the four colors of card stock when making boxes for multiple sets, so that you use your supplies more evenly. Each package of medium envelopes contains 40 envelopes, so you'll want one package for every 10 sets you make. If your DSP colors will coordinate well, consider using two Whisper White envelopes, and two Very Vanilla envelopes per Four Pack, for variety.

Stampin' Supplies: Upsy Daisy stamp set, 8-1/2"x11" card stock in the following colors (Not Quite Navy, Basic Gray, Baja Breeze, and Kiwi Kiss), Classic Ink Pads in the following colors (Not Quite Navy, Basic Gray, Baja Breeze, and Kiwi Kiss), scrap pieces of Whisper White and Very Vanilla card stock, Urban Garden Designer Series Paper, Baja Breeze 1" Double Stitched Grosgrain ribbon, Whisper White Tafetta ribbon (and Stampin' Sponges to dye ribbon using ink pad), Very Vanilla 1/4" Grosgrain ribbon, Wide Oval Punch, Star Punch (small), Horizontal Slot Punch, Mini Glue Dots, Stampin' Dimensionals, Cutter Kit (distressing tool).

DISCLAIMER: Both 4"x4" cards, and 4-1/4"x4-1/4" cards are too small to be mailed through the Post Office. You will want to save these cards to hand deliver, or you may place them in a full sized medium envelope for postal mailing.

Wednesday, August 13, 2008

Never Before Seen Special

Click HERE to view full-color flyer


With the unveiling of the new 2008 Fall-Winter Idea Book & Catalog (right click HERE to download .pdf version of catalog--large file), comes a Never Before Seen Special! A select group of brand new stamp sets will be available at a 15% discount. All of the stamp sets new to this catalog are die-cut, which means you don't have to trim the rubber before assembly. It's just pop, peel, stick, and then stamp!


Below you will find a list of the stamp sets on sale, the page numbers where they can be found in the new catalog, and their discounted prices:


*Felicidades Siempre set is featured in the Celebrando Creatividad, a U.S. Hispanic/Latin supplement to the Fall-Winter Idea Book & Catalog. Click HERE to download and view the Celebrando Creatividad on Stampin' Up!®'s new Spanish language web page.

As a footnote, the release of the stamp set Putt Putt has been delayed for quality assurance. I will let you know as soon as I hear it is available for order!

Everything's coming up daisies with this Never Before Seen special, and I'd love to do a workshop to convince your guests they NEED these new stamps!

As a BONUS, I'm offering a booking special through September 30th: If you book, hold and close a party with at least $350 in customer orders, I will let you choose one In Color ink pad, and an ink refill for the pad, for FREE! There are 6 wonderful new In Colors to choose from, so contact me today to book your date before someone else picks it first!

Summer Days

I'm cleaning my way out of my pre-Convention mess, and getting ready to do a free class at the Rockrimmon Branch of the Pikes Peak Library District tomorrow, from 10:30am-12:30pm. I thought I'd give you a little sneak peek at what we'll be making...


This stamp set is not in the 2008 Fall-Winter Idea Book & Catalog, it's actually on what's called the Dormant List. You can order it, it's just considered out of season, as it is a "summer" set. The page is 6"x6", and there is a little innertube at the bottom right of it, which is covered by the card. The card is 6"x3" and uses the same stamp set and colors. If you come to the library tomorrow while I'm there, you can choose which one of these FREE Make & Takes you'd like to make!

The new items on these projects are the Pacific Point blue card stock and ink pad, and the Curly Label Punch. You can see a sample below of my own personal finished page.


Stampin' Supplies: Life's a Breeze stamp set, Something Fishy Jumbo Wheel, Whisper White card stock, Bashful Blue card stock and ink, Pacific Point card stock and ink, Summer Sun card stock and ink, Only Orange ink, Basic Black ink, Boho Blossoms Punch, Scallop Punch (used for making clouds), Stampin' Sponge®, Bashful Blue Striped Grosgrain, Curly Label Punch.

Wednesday, August 6, 2008

I'm ba-a-a-a-ck!!! (but my stamps aren't)

I had hoped to share a post with you today, using some lovely samples from new stamp sets, but that's not going to happen. I left a 42 pound box of my stamping supplies with my hotel, to ship home for me so I would not have to carry them in my luggage and risk getting them all mashed by baggage handlers like they were when I flew out to Convention!

However, my package did not arrive today, as expected. When I checked the UPS tracking, it showed that the package still had not even been received by UPS. What in the heck?!? So, I called my hotel (who shall remain unnamed to protect the ignorant, I mean, innocent) and lo and behold, my package was sitting right under their little noses. They neglected to hand it over to the UPS man not one, but TWO days in a row, and even today when I called they told me they had just called the UPS guy to "come back" and pick up my box. So, apparently for three days in a row my box sat on their counter. Did I mention it was a 42 pound box?? It's not like it could hide even if it wanted to.

And when I say that all my stamping supplies were in there, I mean the BASICS were in there...new stamp sets, new ink pads, stamp cleaning pads, Paper Snips, SNAIL--the works! I had all this stuff because I did a demo on the evening of the last day of Convention. Of course, I can't even post the details of that cool project yet because all my samples and supplies are in the BOX I STILL HAVEN'T RECEIVED.

All I can say is that there were some great announcements at Convention, like the fact that Stampin' Up!® will be carrying the Sizzix Big Shot die-cutting machine, some exclusive dies, and also some Sizzix non-exclusive dies which coordinate with the exclusive ones. This means that you can order your Sizzix supplies through me now, and get HOSTESS BENEFITS on your Sizzix purchases!!!

So what's a stamp-a-holic to do? CALL ME, of course, at 719-205-5957 (local to Colorado Springs)! Book your workshop today, to be one of the first to get a FREE NEW CATALOG, and one of the first to have a party out of the new catalog. Or, if you're like me, place your own order of $150 or more and receive Hostess Benefits from your own purchases. The new catalog is open for ordering on August 11th, 2008 at NOON Mountain Standard Time...I'll be there with bells on!