Showing posts with label ghirardelli. Show all posts

Wednesday, March 27, 2013

Easter Envelope Ghirardelli Squares Holder

Just a quick photo share...I'll be back tomorrow with a FREE Printable for you, so you can make these yourselves.  I slaved all morning in My Digital Studio, so you don't have to!!! They are purposefully not froo-froo and frilly, so you can just make up a bunch of them whether you want to hand them out to girls OR boys. Aside from the printable, all you'll need are some snips and glue, a standard A2 envelope (4-3/8" x 5.75"), which is the size of any of our Medium Envelopes (Crumb Cake - like I used, Very Vanilla, or Whisper White), and a couple of Ghirardelli Chocolate Squares to tuck inside. FYI: the printable will give you supplies for four treat holders on an 8-1/2" x 11" page.


Meet me back here tomorrow for your FREE Printable, and a quick photo tutorial!

~Kimberley Morris Colorado Springs, CO
Stampin' Up! Independent Demonstrator since 1994
procrastistamper@gmail.com
http://kimberley.stampinup.net (SHOP ONLINE 24/7!)  
BECOME A DEMONSTRATOR
Connect with me on FACEBOOK
Connect with me on PINTEREST
Connect with me on TWITTER  
SUBSCRIBE to my Blog via EMAIL

Friday, March 22, 2013

Last Minute Sale-a-Brating with Pretty Petites & Petite Curly Label!

I wanted to give some chocolate to a gal who was coming over to pick up some catalogs from me (hi Judy!) so I made what I think must be the fastest treat holder I have EVER come up with. Seriously, this takes like 90 seconds to make--including primping the bow:

Ghirardelli Creamy Devotion for one, coming right up!
Super easy...just cut out the Apothecary Accent Framelit (largest shape), then run through the Big Shot with the Chevron Embossing Folder, fold shape in half, punch hole at top, slide Ghirardelli Chocolate Square inside, and tie Seam Binding around and through the hole in a bow. Add the stamped & punched image with a Stampin' Dimensional. Done.

Stampin' Supplies: Crumb Cake card stock 120953, Whisper White Card stock 100730, Marina Mist ink pad 126962, Apothecary Accents Framelits 127003, Chevron Embossing Folder 127749, Big Shot 113439 (for Framelits and Embossing Folder) 1/16" Hole Punch 101227 (or hole punch from Itty Bitty Shapes Punch Pack 118309), Baja Breeze Seam Binding Ribbon 122331, Stampin' Dimensionals 104430, Pretty Petites stamp set (SAB Freebie), Petite Curly Label Punch (SAB Freebie).

SHOP NOW for the Stampin' Supplies to Make This Project!

~Kimberley Morris Colorado Springs, CO
Stampin' Up! Independent Demonstrator since 1994
procrastistamper@gmail.com
http://kimberley.stampinup.net (SHOP ONLINE 24/7!)  
BECOME A DEMONSTRATOR
Connect with me on FACEBOOK
Connect with me on PINTEREST
Connect with me on TWITTER SUBSCRIBE to my Blog via EMAIL

Monday, May 21, 2012

Two Pocket Mini Card & Treat Holder

Sorry I've been MIA lately, my youngest was finishing up her senior year of high school, and we are still working on graduation celebration activities! I just made the cutest little treat holder...of course, I think they're all cute...but this one (like all my favorites) involves chocolate!
It's super simple to make, and the dimensions are perfect for using full sheets of paper. My samples use the Sweet Shop Designer Series Paper (DSP) from the Occasions Mini Catalog, and some coordinating stickers, which are no longer available. [But I bet they'll show up on the Clearance Rack so keep your eyes peeled!] You can use any DSP and coordinating card stock you want--I chose mine because I wanted to use it up.
Remember: Click on any picture to see it full-size.
You're going to need some 12x12 paper, and our Designer Series Paper is perfect, with coordinating double-sided patterns. Each sheet will yield 4 of these holders. In our Designer Series Paper packages, you usually get 2 sheets of each pattern, so that is 8 holders of the same pattern. For the card inside each, you use 1/8 of a sheet of 8-1/2"x11" card stock, so you can cleanly use a whole sheet of a coordinating color for your 8 holders of the same pattern!
Cut each 12x12 sheet down to four 6"x6" sheets. Using the Diagonal Plate on the Simply Scored Tool, score each 6x6 sheet in half diagonally from tip to tip. This means you start at zero on the ruler and score diagonally all the way across the sheet.
Then, you will score at 3/4" on each side of that middle score line. If you look at my photos below, you'll see that I use the ruler across the top, as well as the ruler down the left side, without lifting my paper. This is NOT how the Simply Scored Tool was intended to be used, because the left side ruler does not have the handy channels going down it for your scoring tool to slide into. Unless and until you are comfortable doing this, you will want to turn your paper turn your paper 180 degrees to get that 3/4" mark on the other side of the center line.
Okay, then you will want to turn your paper 1/4 turn from where you originally had it when you scored the first diagonal. On my paper, the cupcakes were upright when I started. In the picture below, you can see the top of the cupcakes are pointing to the right...because I have turned the paper one quarter turn.
Now, score each of the ends at 2-1/4", as shown below. Your 2-1/4" score marks will cross over the lines you already scored. Again, I leave my paper on the board and use both the top ruler and the left side ruler when I score diagonally. Please use only the top ruler with the channels coming down for your stylus, unless and until you are comfortable enough to use the left ruler. Note that using only the top ruler means you will have to turn your paper 180 degrees for the score on the opposite end.
From here is it cake (or cupcakes, as the case may be). Fold each of the 2-1/4" sides in on the score lines, toward the center, as shown below.
Fold this resulting piece in half on the center score line by bringing the criss-crossed "pockets" in towards each other, as shown below.
Then, fold each of the "pockets" back on its respective 3/4" score line, as shown below, so that the pointy tips of your holder meet. Crease firmly, and hold tips together while you punch a 1/2" Circle Punch near the top of the tips. Finish it by looping a 6" strip of coordinating Ribbon through the holes and pulling tight to hold tips together.
A Ghirardelli Chocolate Square™ fits in one pocket, and then I put a little card in the other pocket on the other side. To make the card, simply cut a sheet of 8-1/2x11 card stock into 8 pieces (2-3/4x4-1/4). Score each card at 2-1/8". I used the smallest of the Labels Collection Framelits Dies for the front layer of each card. Some of them were turned one direction on the card front (as with the sample at the top of this post), others were turned the other way, just depending on the image I wanted on each.
This is important: each of these die cuts is adhered to the center of each card front with only ONE Stampin' Dimensional, right smack in the center back. To get your card to fit snug down in the pocket, make sure the points on your dimensional are pointing down into the 'V' of the criss-cross in the holder pocket. This allows you to tuck the card in the pocket, with the criss-cross of the pocket sliding up under the label. So when you pull the card out, the label is actually on the card front, not on the holder--fun, huh? See the pictures below for orientation of dimensionals in accordance with orientation of die cut. The dimensional placement on the left is for a tall-skinny orientation like the 3 samples pictured above. The dimensional placement on the right is for a short-wide orientation like the sample at the top of this post.
That's it, now get to it! These make great party favors (I'm using mine for my daughter's graduation party), but they are also wonderful little thank you cards with a treat in them! If your kids aren't out of school yet, they could easily help you make a handful of these for teachers and administrative staff. If they are having an end of year party with their classmates, they could put their photo on front of the card (cut out with the framelit), and print their name & phone number/email address out on a sheet of return address labels, and put a label inside each card so their friends can keep in touch over the summer.

~Kimberley Morris
Stampin' Up! Independent Demonstrator since 1994
Colorado Springs, CO
procrastistamper@gmail.com
http://kimberley.stampinup.net (SHOP ONLINE)
BECOME A DEMONSTRATOR

Monday, October 3, 2011

Ghirardelli® Chocolate Square™ Treat Wrap

Today I have a quick and easy treat holder you can make for Halloween. The cello bag inside perfectly holds a Ghirardelli® Chocolate Square™, and the way the holder is put together, the recipient doesn't have to tear anything to get the treat out! I really like these colors together for Halloween...they are Wisteria Wonder, Pear Pizzazz, and Peach Parfait.


The dimensions of the folder are 7-1/4" x 3-1/2", scored 3-1/2" from each short end. (LOVE, LOVE, LOVE the Simply Scored Scoring Tool for this!) These score marks will leave 1/4" in the center, to accommodate the bulk of the candy.

Now, the two features of this holder that allow it to be opened without ripping anything, are the ribbon and the cello bag. The ribbon is tied in a square knot, and can be slid down to the bottom of the folder to take it off. The cello bag is folded in half, with the opening facing the bottom of the folder, and some Sticky Strip on the back of it, just below the fold line. This means the candy is held in place securely in the bag, and you just flip up the bag and the candy slides down and out of the bag! Check out the picture below to see more detail. [As always, you can click on any picture to see it full size.]


Again, you can certainly bling the heck out of these, but I didn't want to spend a lot of time on them, or money on them, because the chocolates can be pricey by themselves. And because of that expense, and the higher quality candy, I would definitely reserve these treats for the appreciative adult palate! Maybe think about having a handful prepared for the parents of the young trick-or-treaters who come to your door :-)

Stampin' Supplies: Delightful Dozen stamp set, Halloween Hang-ups jumbo wheel, Wisteria Wonder card stock, Peach Parfait card stock, Pear Pizzazz Stitched-Poly Ribbon (15"), Basic Black ink pad, Versamark ink pad (to ink wheel), Stampin' Dimensionals, Small Cello Bags (3x5), Sticky Strip, Simply Scored Board.


~Kimberley Morris
Stampin' Up! Independent Demonstrator since 1994
Colorado Springs, CO
procrastistamper@gmail.com
http://kimberley.stampinup.net (SHOP ONLINE)
BECOME A DEMONSTRATOR

Monday, January 24, 2011

Valentine Ghirardelli Treat

This is a re-post of a project I showed you last Valentine season. It's very easy to make, and you can make it for any season or occasion (or for no reason at all!):


Click HERE for the photo tutorial blog post.

This would also be cute if you made it with the Filled With Love stamp set, and Love Patterns Designer Series Paper. Click HERE for more details on that promotion. Today is the LAST DAY TO ORDER those items, so get yours NOW, and you can make these super easy Ghirardelli Chocolate Square treats for your sweeties!

Stampin' Supplies from my ONLINE STORE: Crumb Cake card stock, Pretty in Pink card stock, Melon Mambo card stock and ink pad, I {Love} Love Jumbo wheel & handle, With All My Heart stamp set, Full Heart Punch, Magnetic Movers & Shapers Large Heart Die, Distressing Tool (in Cutter Kit), 1/16" Circle Punch, Photo Corner Punch, Linen Thread, Very Vanilla Tafetta Ribbon, Mini Glue Dots, Stampin' Dimensionals, Crop-a-Dile (to make holes for ribbon), Word Window Punch, Bone Folder (for scoring).

~Kimberley Morris
Stampin' Up! Independent Demonstrator since 1994
Colorado Springs, CO
procrastistamper@gmail.com
http://kimberley.stampinup.net (SHOP ONLINE)
BECOME A DEMONSTRATOR

Monday, December 13, 2010

Ghirardelli® Chocolate Square™ Holder

This is basically a rehash of a project I designed a while back--they are great for any occasion, but right now they'd be awesome stocking stuffers, gifts for teachers, and handy treats to keep by the door to hand out to all those delivery people and mail carriers bringing your holiday cards and goodies to you!


Click HERE for the tutorial.

Stampin' Supplies: Simple Snowflake stamp, Jumbo Sassy Sparkles wheel, Marina Mist card stock & ink, Whisper White card stock, Snowflake Punch, 2-3/8 Scallop Circle Punch, Word Window Punch, Perfect Polka Dots Embossing Folder (used with Big Shot), Paper Piercer & Mat Pack (to make hole for Rhinestone Brad), Rhinestone Brad (clear), Crop-a-Dile (to make ribbon holes), White Tafetta Ribbon.

~Kimberley Morris
Stampin' Up! Independent Demonstrator since 1994
Colorado Springs, CO
procrastistamper@gmail.com
http://kimberley.stampinup.net (SHOP ONLINE)
BECOME A DEMONSTRATOR (my Recruiting Auth. Password is newdemonstrator)

Friday, January 15, 2010

Valentine Ghirardelli Treat Holders

It's been really busy around here, but I wanted to post some updated Ghirardelli Treat Holders for you! Look back at THIS POST for a tutorial, and see the supplies listed below for colors and additional accessories.


These would be super adorable if you used Kraft Tafetta Ribbon on the pink one, and Pretty in Pink Tafetta Ribbon on the kraft one. Or, make them frilly and froo-froo by spritzing with Shimmer Mist (spray bottle 3/4 full of rubbing alchohol, plus Champagne Mist Shimmer Paint), and using Whisper White Organza Ribbon or Satin Ribbon, and some beads and half-pearls from the Pretties Kit. I used Very Vanilla Tafetta Ribbon on both of mine because that's what I had available.

You should be able to get supplies for three holders from each sheet of 8-1/2" x 11"card stock. The banner is 1/2" x 3", and the hearts can be punched from left over scraps you roll over with the wheel. If you use two complimentary colors, you'll have supplies for 6 holders--3 of one color, 3 of the other. The only extra card stock you need is the Melon Mambo for the large heart layer.

Shop for these Stampin' Supplies in my ONLINE STORE: Kraft card stock, Pretty in Pink card stock, Melon Mambo card stock and ink pad, I {Love} Love Jumbo wheel & handle, With All My Heart stamp set, Full Heart Punch, Magnetic Movers & Shapers Large Heart Die, Distressing Tool (in Cutter Kit), 1/16" Circle Punch, Photo Corner Punch, Linen Thread, Very Vanilla Tafetta Ribbon, Mini Glue Dots, Stampin' Dimensionals, Horizontal Slot Punch, Word Window Punch, Bone Folder (for scoring).

~Kimberley Morris
Stampin' Up! Independent Demonstrator
Colorado Springs, CO
procrastistamper@gmail.com
http://kimberley.stampinup.net

Friday, November 20, 2009

Gobble, Gobble Ghirardelli Treat Holders


Check out the original tutorial for this treat holder HERE.

This pattern is an oldie, but a goodie! As always, feel free to click on the images in this post to see full-size pictures. You can make your treat holders simple (see pic below), or add the 'give thanks' saying to each treat holder on a tag (as shown above). I wanted to make these for you a good while back, but life got in the way. Among a million other things, we even had a trip to the E.R. yesterday--but everyone's okay, thankfully. The kids have a full week's break from school next week for Thanksgiving, so they can recover and rejuvenate! And I can SLEEP IN!!!


Aren't these treat holders cute? I've never seen such adorable turkeys. Don't you want to put these on your Thanksgiving table??? The cool thing is that you can take out the treat and eat it, and you don't have to rip the holder to do it. So, you could replace the chocolates and use the treat holders at your Thanksgiving table in future years if you really wanted to.

Or, you could be a total turkey and eat the chocolate, then carefully tuck the wrapper back in the holder and prank someone else into thinking they're getting a treat...lol! Yeah, you're right, that's mean. But you will probably be around family next week and if you do it to your older brother who's always been a turd to you, aren't you just facilitating karma?

Anyway, due to experiencing life these last few weeks, I really didn't give you enough time to order supplies to make these, but I wanted to make sure you saw them before next week. To recreate these you'd need the following Stampin' Supplies:
  • Gobble, Gobble stamp (Item 116535, $6.95)
  • Bright Blessings Jumbo wheel (Item 115626, $8.50)
  • Jumbo Wheel handle (Item 103661, $5.95)
  • Soft Suede Classic Ink Pad (Item 115657, $5.95)
  • Scallop Circle Punch (Item 109043, $15.95)
  • Stampin' Dimensionals (Item 104430, $3.95)
  • SNAIL Adhesive (Item 104332, $6.95)
  • Stampin' Sponges (Item 101610, $3.50)
  • 12"x12" In Color Textured card stock (Item 115314, $8.95)
  • Very Vanilla 8-1/2"x11" card stock (Item 101650, $7.50), OR
  • Whisper White 8-1/2"x11" card stock (Item 100730, $7.50)
  • Rich Razzleberry 1/2" Polka Dotted Ribbon (Item 115613, $9.95)
  • Soft Suede 1/2" Polka Dotted Ribbon (Item 115612, $9.95)
  • Crushed Curry 1/2" Polka Dotted Ribbon (Item 115614, $9.95)
  • Dusty Durango 1/2" Polka Dotted Ribbon (Item 115609, $9.95)
  • Word Window Punch (Item 105090, $15.95)
  • Modern Label Punch (Item 116630, $15.95)
  • Horizontal Slot Punch (Item 105089, $5.95)
  • 1/16" Handheld Hole Punch (Item 101227, $8.95)
  • Linen Thread (Item 104199, $4.50)
There are a few items listed in bold--if you purchase those now in my ONLINE STORE, you'll have a few of the items you'll need to make some treat holders like the ones shown below, for Christmas. (Be sure to check out the Clearance Rack while you're shopping--you can get up to 80% off surplus inventory!) And, for every order of $50 or more that you place with me, your name is put in my monthly drawing for a FREE STAMP SET!

I'll post the remaining supplies needed for these snowflake treat holders after Thanksgiving. If you want to order the supplies from my ONLINE STORE right now, drop me an email and I'll send you the detailed list so you don't have to wait.

~Kimberley Morris
Stampin' Up! Independent Demonstrator

Colorado Springs, CO

procrastistamper@gmail.com
http://kimberley.stampinup.net

Monday, October 12, 2009

Little Boo Ghirardelli® Treat Holders

It's that time of year again, to make some treat holders for Ghirardelli® Chocolate Squares™. Really, you can make them anytime, but with Halloween coming up, there's no reason for kids to have all the fun. Give a treat for the sophisticated palate with these easy to make holders. [REMEMBER: click on any image to see it larger.]


Check out the original tutorial to create these treat holders HERE.

You can take these with you to hand out to the grownups handing out candy at each home when you go out door-to-door with your kids, or if you're staying home yourself, give these to the parents who are accompanying their kids, when they come to your door. The kids will thank you for keeping their parents' hands out of their trick-or-treat stash!

When you order the following items, you can GET SUPPLIES FOR EIGHT TREAT HOLDERS FREE! With the products below, you'll have everything you need to make your own treat holders, except the Ghirardelli® Chocolate Squares™.


Visit my ONLINE STORE to do your shopping. Be sure to email me to confirm a mailing address for your free treat holder supplies. Assembly notes will also be provided, via email. (You may get the 8 FREE treat holder supplies with any purchase of $50 or more from me this month, you just need to email me to request them.)

For those of you who have the rest of the supplies listed in the table above, or other similar product you'd like to use, to make the Little Boo Treat Holders, I have a kit of the cut, scored, and punched card stock pieces, as well as the ribbon you'll need, available for you to order below. You must order in multiples of 8, and Ordering is only open from October 12th through 19th, so get your supplies TODAY!

LITTLE BOO TREAT HOLDER KIT (Makes 8) $5.95
Supplies in multiples of 8, two each of four color varieties.

Enter No. of Kits: (then click Buy Now)

KIT CONTENTS: 8 treat holders (2 ea in 4 colors), cut, scored, and punched. Also included are 8 lengths of ribbon (2 ea in 4 colors) to tie each holder closed, 8 punched Scallop Circles and 8 layer rectangles (both 2 each in 4 colors). You will also receive a strip of Whisper White card stock approximately 1-1/2"x8-1/2", onto which you may stamp your image (Little Boo) before punching out.

You can also download the entire list of supplies needed to make your own treat holders HERE. If you look at the full supply list carefully, you'll notice that not all of the card stock from the 12"x12" In Color Textured Card Stock package is used. That's totally cool, because you can save those sheets to make the cute Simple Snowflake Treat Holders, shown below. Don't worry, if you don't want to buy all the supplies for those right now, I'll be offering another $50 special soon, where you can get supplies for 8 Simple Snowflake Treat Holders for FREE!


~Kimberley Morris
Stampin' Up! Independent Demonstrator
Colorado Springs, CO
http://kimberley.stampinup.net
procrastistamper@gmail.com

Thursday, October 2, 2008

Ghirardelli® Chocolate Square Holder Tutorial

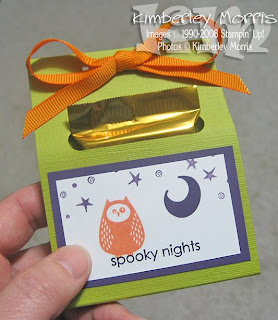
As promised, here are the instructions for making the Halloween Ghirardelli Treat Holder pictured below. If you don't see them in your local store, you can find Ghirardelli® Chocolates online HERE.


Cut a sheet of card stock to 3"x8" for the base. Because of the round numbers, Textured 12"x12" card stock is ideal to use for this project. You can get four 3"x8" treat holder bases from each 12"x12" sheet. If you order an assortment of In Color 12"x12" Textured card stock, you can use the Kiwi Kiss and Tangerine Tango sheets together. Simply cut the 3"x8" bases from each sheet, then use the leftover scraps of each sheet to layer onto the front of the opposite color base!

Okay, back to where I started--cut a sheet of card stock to 3"x8". Then score the card stock at 3-7/8" and at 4-1/8". [Remember, you can click on any picture to view it at full size.]


Optional: If you want to use a Stampin' Around wheel to decorate the base, you should do that now. Just be mindful of your placement with any words or images on your wheel which have a definite "right side up" pattern, as shown in the picture below. Use plain paper to cover and mask off areas on which you don't want the wheeled pattern. Be aware that about 2-1/8" of the top front of your holder will be taken up with the slot for the chocolate, and with a ribbon closure.


From one end of the card stock (choose either, it doesn't matter), slide your Word Window Punch as far into the card stock as it will go, and punch. You will be punching over it on each edge, so just do it somewhere in the middle for placement, as shown below.


Then slide your Word Window Punch over until the side of the punch casing is even with one edge of the card stock. Punch, then repeat this process on the opposite edge of the card stock. See the pictures below for more notes.


You will end up with an extended Word Window Punch shape across one end of your holder, as pictured below. This will be the front of your holder.


Decorate the front of your holder as desired. The area you'll have to work with runs from just below your Word Window punched hole, to the score line, and is approximately 2-1/4". The bottom decorative card stock layer on my treat holder is 2-3/4" x 1-3/4", and the top white layer is 2-1/2" x 1-1/2".


I used Kiwi Kiss, Tangerine Tango, and Eggplant Envy for this project, as I really like that combination for Halloween. The Eggplant Envy card stock I used is not Textured, because I'm layering over it, and it seems a waste to me to have most of the Textured card stock covered up! I also used the Halloween Frights stamp set, and the Frightful Fence wheel (shown on the Optional sample), both available for you to order now from the Holiday Mini Catalog.

After you have decorated your holder, punch two holes in the top front above the Word Window punched hole, with the Rectangle Punch, for a ribbon bow. Fold the holder closed with the edges flush at the top and hold firmly in place, then punch through your rectangle holes on the front, to create holes in the back of the holder at the same place. See pictures of theses steps below:


HORIZONTAL SLOT PUNCH METHOD: This is a great alternative to the Rectangle Punch shown above. Simply slide your card stock into the Horizontal Slot Punch as far as it will go, then line up the corner of your card stock with the bottom piece of metal on the punch, and squeeze. No measuring, no worrying if it's straight or not. I recommend punching each of the 4 corners separately, because it's not good for your punch to punch through more than one layer at a time. (See pictures below for visual--click images to see them larger.)


Thread ribbon through rectangle holes and tie in a bow or knot at the front of your holder. Slide your Ghirardelli Chocolate Square into the Word Window punched slot, and you're ready to share a treat with your favorite ghouls and gargoyles!

On the Frightful Fence sample below, I used brads to close the treat holder, then cut out some shapes from the Halloween Frights stamp set and adhered them over the brads, and in other decorative positions. I also used a Blender Pen in Close to Cocoa ink to go back over the fence and fill in some of the spots which were omitted due to the texture of the card stock. And as a final highlight, I went over the cobwebs in the fence with a Basic Black Stampin' Write® marker.


These Ghirardelli Chocolate Square treat holders can be made even more quickly and easily by using the Ghostly Greetings Designer Series Paper, and you can even include greetings without doing any stamping, if you use the Chills & Thrills Rub-Ons! These treat holders are also versatile throughout the year when decorated seasonally appropriate--consider making them as placecard favors on your Thanksgiving table, as stocking stuffers or treats for co-workers for Christmas, or for Valentine's Day treats. With chocolate, and sharing your creativity, at the heart of this project, you can't go wrong!